สร้างบล็อก
เมื่อต้องการเริ่มเขียนบล็อกด้วยบล็อกเกอร์ ให้ไปที่ หน้าแรกบล็อกเกอร์ ใส่ชื่อผู้ใช้และรหัสผ่านของคุณ จากนั้นคลิกลงชื่อเข้าใช้ ป้อนชื่อที่แสดง และยอมรับข้อกำหนดในการให้บริการของบล็อกเกอร์ จากนั้นคลิกที่ลิงก์ สร้างบล็อก แล้วเริ่มต้นได้เลย!
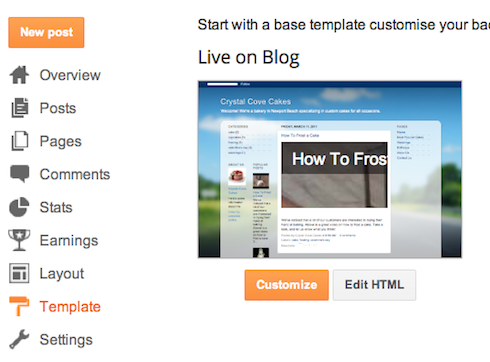
เลือกที่อยู่ (URL) และชื่อบล็อก จากนั้นเลือกเทมเพลตบล็อกที่คุณชอบ (นี่คือลักษณะหน้าตาของบล็อกเมื่อคุณเผยแพร่) จากนั้นก็เริ่มใช้ความคิดสร้างสรรค์ เพิ่มข้อมูลในโปรไฟล์ส่วนบุคคลของคุณ และปรับแต่งลักษณะของบล็อก ถ้าคุณต้องการ เริ่มต้นเขียนบล็อกวันนี้
create a blog
To start blogging with Blogger, go to Home blockers. Enter your username and password. Then click Sign in. Enter a display name And accept the Terms of Service of bloggers. Then click on the link, then start blogging now!
Select the address (URL) and title blocks, then select the template you like the blog. (This is the look and feel of your blog on publishing) then began to use their creativity. Add the information in your personal profile. And customize the look of the blog If you want Start blogging today
แดชบอร์ด
หน้าแดชบอร์ดคือจุดเริ่มต้นของคุณเช่นเคย หน้านี้จะแสดงรายชื่อบล็อกของคุณทั้งหมด และคุณสามารถคลิกที่ไอคอนถัดจากชื่อบล็อกเพื่อดำเนินการต่างๆ กับแต่ละบล็อก เช่น
- เขียนโพสต์ใหม่: คลิกที่ไอคอนดินสอสีส้มบนแดชบอร์ดเพื่อเข้าถึงเครื่องมือการแก้ไขโพสต์
- ดูโพสต์ของคุณ: ไอคอนรายการโพสต์สีเทาจะนำคุณไปยังรายการโพสต์ที่เผยแพร่แล้วและโพสต์ในข้อความร่างของบล็อกนั้นๆ
- ติดตามบล็อกโปรดของคุณ: ด้านล่างรายการบล็อกของคุณ คุณจะเห็นรายการบล็อกที่คุณติดตาม พร้อมข้อความตัวอย่างจากโพสต์ล่าสุดของบล็อกเหล่านั้น
ภาพรวม
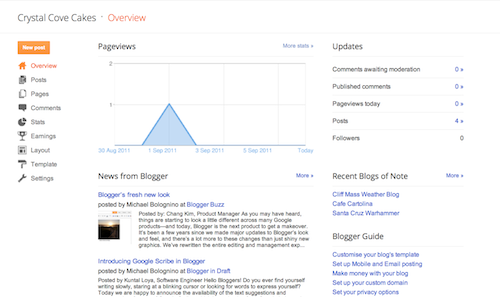
บนแท็บ ภาพรวม คุณจะเห็นกิจกรรมต่างๆ ของบล็อก ข่าวสาร และเคล็ดลับจากทีมบล็อกเกอร์ และบล็อกล่าสุดของกระดาษโน้ต
เขียนโพสต์ของคุณ
เมื่อคุณลงชื่อเข้าใช้บล็อกเกอร์แล้ว คุณจะเห็นแดชบอร์ดพร้อมด้วยรายชื่อบล็อก ต่อไปนี้คือสิ่งที่คุณต้องทำ
- คลิกที่ไอคอนรูปดินสอสีส้มเพื่อเขียนโพสต์ใหม่ และป้อนอะไรก็ได้ที่ต้องการแบ่งปันกับคนทั้งโลก
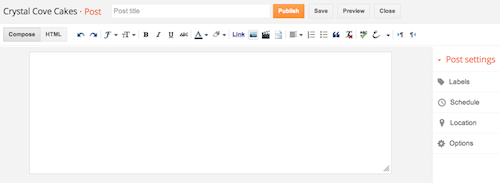
- ถัดไป คุณจะเห็นหน้าเว็บของเครื่องมือแก้ไขโพสต์ เริ่มต้นด้วยการตั้งชื่อโพสต์ (ไม่จำเป็น) จากนั้นป้อนเนื้อหาโพสต์
- เมื่อดำเนินการเสร็จแล้ว ให้คลิกปุ่ม ดูตัวอย่าง ที่ด้านบนเพื่อตรวจสอบให้มั่นใจว่าพร้อมที่จะดำเนินการ จากนั้นคลิกที่ปุ่ม เผยแพร่ เพื่อเผยแพร่โพสต์
เพิ่มรูปภาพ
คุณสามารถเพิ่มภาพจากคอมพิวเตอร์หรือจากเว็บไปยังบล็อกของคุณ คลิกที่ไอคอนภาพในแถบเครื่องมือของเครื่องมือแก้ไขบทความ หน้าต่างใหม่จะปรากฏขึ้น เพื่อให้คุณเรียกดูไฟล์ภาพจากคอมพิวเตอร์ หรือป้อน URL ของภาพบนเว็บ
เมื่อคุณเลือกภาพได้แล้ว คุณจะสามารถเลือกการออกแบบเพื่อกำหนดว่าภาพของคุณจะปรากฏในบทความอย่างไร:
- ตัวเลือก "ซ้าย" "กึ่งกลาง" และ "ขวา" ช่วยให้คุณปรับแต่งวิธีที่ข้อความบล็อกจะล้อมรอบภาพของคุณ
- ตัวเลือก "ขนาดภาพ" จะกำหนดขนาดของภาพที่จะปรากฏในบทความของคุณ
คลิก อัปโหลดภาพ เพื่อเพิ่มภาพของคุณ จากนั้นคลิก เสร็จสิ้น เมื่อหน้าต่างการแจ้งปรากฏเพื่อแจ้งให้คุณทราบว่า "เพิ่มภาพของคุณแล้ว" จากนั้น Blogger จะนำคุณกลับสู่เครื่องมือแก้ไขบทความ ซึ่งคุณจะพบภาพของคุณพร้อมสำหรับการเผยแพร่ในบล็อกของคุณ
แดชบอร์ดคือจุดเริ่มต้นของคุณเช่นเคย หน้านี้จะแสดงรายชื่อบล็อกของคุณทั้งหมด และคุณสามารถคลิกที่ไอคอนถัดจากชื่อบล็อกเพื่อดำเนินการต่างๆ กับแต่ละบล็อก
Dashboard is your starting point, as always. This page will list all of your blogs. And you can click on the icon next to the blog name to perform various tasks. Each such block
Write a new post: click the pencil icon on the orange dashboard to access the post editor.
View post: Your post gray icon will take you to a list published and posted in the message body of the blog post itself.
Follow your favorite blogs: below list to your blog. You will see a list of blogs you follow. And a sample from the last post of those blogs.
Overview
Overview
On the Overview tab, you will see the events of the blog, news and tips from the Blogger team. And the last block of notes
Back to top
Write your posts
When you sign up blockers. You will see a dashboard with your blog. Here is what you need to do.
Click the orange icons pencil to write a new post. And enter anything you want to share with the world.
Next you will see a web page editing tool post. Start with the post title (optional), then enter the content posted.
New Post
When done, click the Preview button at the top to ensure that it is ready to perform. Then click on the Publish button to publish the post.
Add a picture
You can add a photo from your computer or from the web to your blog. Click on the icons in the toolbar of the editor. A new window will appear To browse files from your computer or enter the URL of an image on the web.
When you select an image, then You can choose a design to determine how your image will appear in the article.
The "left", "center" and "right" allows you to customize how the text block to surround your image.
The "size" is the size of the image appears in your article.
Click to increase image upload your image, then click Finish when the window appears to let you know. "Add a photo of you," and then bring you back to your Blogger post editor. You will find your images ready for publishing to your blog.
ไม่มีความคิดเห็น:
แสดงความคิดเห็น